Honestly… idli isn’t just food. It’s a feeling.
Maybe you grew up eating it. Or maybe you discovered it later, at a friend’s house, or some tiny breakfast place where steam hits your face the moment the lid opens.
For me, Idli Recipe mornings are slow mornings. The kind where nothing urgent is happening. The batter is already ready. The kettle is whistling. And you’re half awake, half hungry, just waiting.
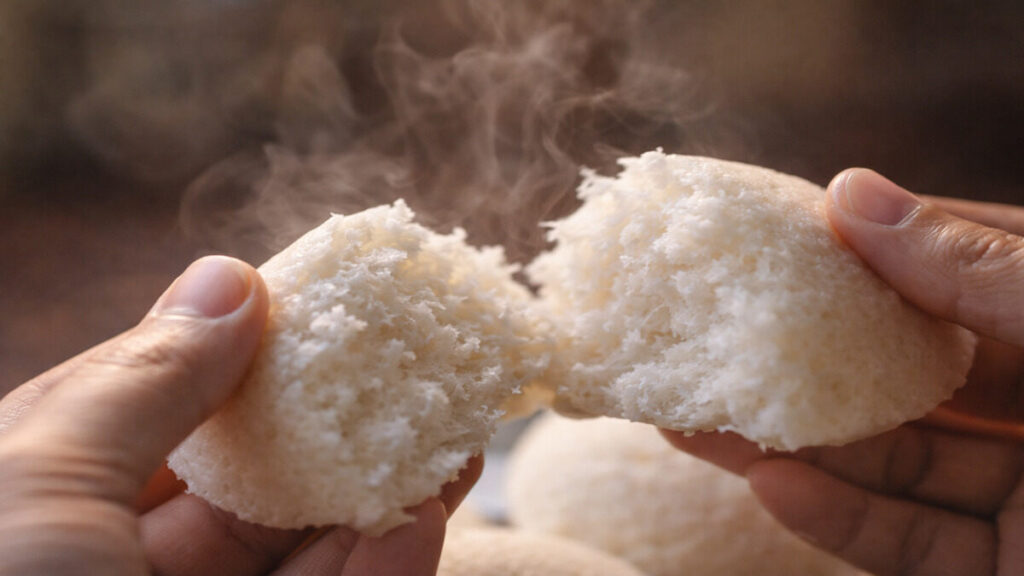
Idli looks simple—almost boring, if you judge it too fast. White. Soft. Quiet. But trust me… when it’s done right, it’s magic. Light on the stomach. Warm. Gentle. The kind of food that doesn’t shout for attention but somehow stays with you all day.
I’ve messed up idli before. Flat ones. Sour ones. Rock-hard ones—been there. But once you get the rhythm, it becomes second nature. No stress. No drama. Just steam… and patience.
Quick recipe overview (the real kind)
This is not a rushed recipe. Idli Recipe needs time, mostly for soaking and fermenting. Actual hands-on work? Very little.
You’ll soak rice and urad dal, grind them smooth, let the batter rest overnight, then steam. Prep time feels long because of soaking, but active work is maybe 30–40 minutes total. Cooking time is short—around 10–12 minutes per batch. This recipe easily serves 4 people. Difficulty? Medium… but only because fermentation has moods.
Idli Recipe
Ingredients
Equipment
Method
Notes
- Batter should be thick but flowing—not runny.
- Don’t open the steamer lid too early. Been there… ruins the fluff.
- If batter smells mildly sour, it’s perfect.
Equipment you’ll actually need
Nothing fancy here. If you cook Indian food, you already have most of this.
You’ll need a mixing bowl—big enough because batter rises.
A mixer grinder or wet grinder (wet grinder is better, but not compulsory).
Idli plates—metal or non-stick, whatever you have.
An idli steamer or deep pot with lid.
A spoon, ladle, and maybe a clean cloth.
That’s it. No thermometers. No scales. Relax.
Ingredients (with real notes, not textbook talk)
- Idli rice – 2 cups
Parboiled rice works best. Regular rice can work too, but texture changes a bit. - Urad dal (split, skinless) – 1 cup
Good quality dal matters here. Old dal = dense idli. Learned that the hard way. - Fenugreek seeds – ½ teaspoon
Sounds small, but don’t skip it. Helps fermentation and softness. - Water – as needed
Cold while grinding. Not ice-cold… just cool. - Salt – to taste
Add after fermentation. Trust me on this.
That’s it. No baking soda. No yeast. Real idli doesn’t need shortcuts.
Cooking method – slow, human, slightly messy (the good way)
Start the night before. Or early morning, if you’re patient.
Wash the rice properly—until the water runs mostly clear. Soak it in enough water so it’s fully covered. In another bowl, soak the urad dal and fenugreek seeds together. Let both rest for at least 5–6 hours. Overnight is even better.
Grinding comes next. Drain the urad dal first. Grind it with small splashes of cold water. Go slow. The texture should be fluffy and smooth—almost like whipped cream. This step matters a lot. Transfer it to a large bowl.
Now grind the rice. Slightly grainy is okay. Not paste-smooth. Think fine semolina texture. Add it to the same bowl.
Mix both using your hand. Yeah, hand. Sounds weird but… warmth helps fermentation. Mix gently, lifting and folding. Don’t beat it like cake batter.
Cover the bowl. Keep it somewhere warm. Not hot. Just cozy.
Then wait.
After 8–12 hours, the batter should rise and smell slightly tangy—not sour. If it hasn’t risen much, give it more time. Weather plays games here. Been there.
Once fermented, add salt. Mix lightly. Don’t deflate it too much.
Grease the idli plates lightly. Pour batter—not too full. Steam in boiling water for about 10–12 minutes. Don’t open the lid early. I know it’s tempting.
Check with a toothpick. If it comes out clean, you’re good.
Rest the idlis for a minute. Then scoop them out gently.
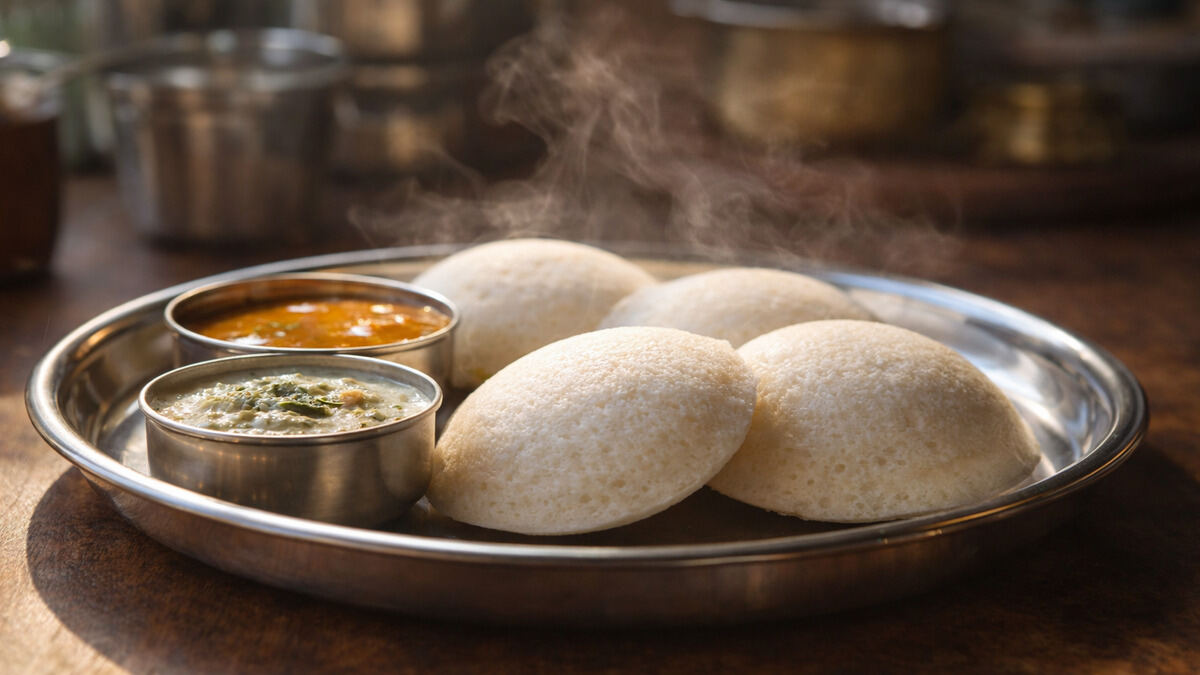
And there it is. Soft. Steaming. Perfect—most days.
ALSO READ: Old-School Beef Knuckle Recipe for Slow, Cozy Days
Variations & substitutes (because life isn’t fixed)
If fermentation is tricky where you live, adding a spoon of poha (flattened rice) while grinding rice helps softness.
For ragi idli, replace half the rice with ragi flour—mix it in after fermentation. Earthy taste. Very filling.
Want spicy idli? Add grated carrot, chopped coriander, or green chilli directly into batter before steaming.
For diet-friendly idli, reduce rice slightly and increase urad dal. Texture changes a bit, but still good.
Leftover idli batter can also become uttapam. Nothing wasted.
Idli Recipe Health benefits (keeping it real)
Idli is light. That’s its biggest win.
It’s steamed, not fried. Easy on digestion. Fermentation improves gut health—slowly, naturally.
Urad dal adds protein. Rice gives energy without heaviness.
It’s low in oil, low in spice, and gentle on the stomach.
Is it a miracle food? No.
Is it a good everyday breakfast? Absolutely.
Approximate nutrition (rough idea, not lab numbers)
One Idli Recipe is low in calories, mostly carbs with some protein.
Fat is minimal unless you drown it in ghee—which… no judgment.
It keeps you full without making you sleepy. That’s the sweet spot.
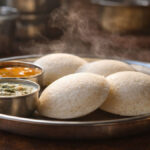
Serving suggestions (personal opinion, always)
Classic way? Coconut chutney and hot sambar. Nothing beats that.
But honestly… plain idli with a little ghee and podi ? Heaven.
Leftover idli sautéed with onions and mustard seeds? Don’t knock it till you try it.
I even eat cold idli sometimes. Sounds sad, but with chutney—it works.
Storage, leftovers & reheating tips
Fresh Idli Recipe is best. Always.
But if needed, store them in an airtight box in the fridge for up to 2 days.
To reheat, sprinkle water and steam for 3–4 minutes.
Microwave works too, but cover them with a damp cloth. Dry idli is just… no.
FAQs
1. Why didn’t my idli batter ferment?
Cold weather, old dal, or not enough grinding. Keep it warmer and give it time.
2. Can I use regular rice instead of idli rice?
Yes, but texture will be slightly less fluffy. Still edible. Still good.
3. Why are my idlis hard?
Either batter is too thick or fermentation was weak. Also—oversteaming makes them tough.
4. Can I add baking soda?
You can… but you shouldn’t. Real idli doesn’t need it.
5. How sour is too sour?
If it smells sharp or vinegary, it’s gone too far. Slight tang is perfect.
6. Can I freeze idli?
You can, but texture suffers. Refrigeration is better.
Final thoughts – from my kitchen to yours
Idli Recipe teaches patience.
You can’t rush it. You can’t force it. And when it works—it feels oddly satisfying.
Some days it rises beautifully. Some days it doesn’t. And that’s okay. Cooking is like that. Life too, honestly.
Make idli when you want comfort. When you want something gentle. When you don’t want heavy food or heavy thinking.
Steam it. Eat it hot. Share it if you can.