Honestly… egg biryani is one of those dishes I go back to when I don’t want drama in the kitchen. No long marination. No fancy cuts of meat. Just eggs, rice, spices, and a little patience. And somehow — it still feels special.
The first time I made egg biryani, I thought, “Is this even real biryani?” Sounds weird but… one bite changed my mind. The eggs soak up all that masala, the rice stays fluffy, and the whole kitchen smells like you actually planned something big. Even if you didn’t.
This is the kind of food you make on a lazy Sunday. Or after a long workday when you want comfort, not chaos. I’ve messed this up before — burned onions, overcooked rice, you name it. Been there. But once you get the rhythm, it becomes easy. Trust me.
Let’s cook. Slowly. No stress.
Quick egg biryani overview (before the stove gets hot)
This egg biryani doesn’t take all day, which I love. Prep takes around 20 minutes, mostly chopping and boiling eggs while the rice soaks. Cooking is another 35–40 minutes, depending on how calm you are with the flame. It serves 3 to 4 people comfortably — maybe 2 if everyone’s really hungry. Difficulty-wise, I’d say medium, but friendly-medium. Nothing scary.

Egg Biryani
Ingredients
Equipment
Method
Notes
Equipment you’ll actually need
No fancy tools here. Just real kitchen stuff.
A heavy-bottom pot or deep pan is important — biryani hates thin pans. You’ll need a medium saucepan for boiling rice and eggs. A sharp knife, a cutting board, one slotted spoon, and a regular spoon for stirring. That’s it. If you have a tight lid for dum cooking, great. If not… foil works. I’ve done it.
Ingredients (with honest little notes)
For the rice:
- 1½ cups basmati rice — wash till water runs mostly clear, don’t rush this
- 4–5 cups water — for boiling
- 2 green cardamom pods
- 1 small bay leaf
- 1 teaspoon salt — rice should taste slightly salty, not bland
For the eggs:
- 6 large eggs — boiled, peeled, and lightly slit
- ½ teaspoon turmeric powder
- ½ teaspoon red chili powder
- A pinch of salt
- 1 tablespoon oil — for shallow frying, optional but worth it
For the biryani masala base:
- 3 tablespoons oil or ghee — ghee gives better aroma, oil is fine
- 2 medium onions, thinly sliced — take your time here
- 1 tablespoon ginger-garlic paste — fresh is best, but jar works
- 2 green chilies, slit — adjust, don’t be brave for no reason
- 1 cup thick yogurt (curd) — whisked, no lumps please
- 1 teaspoon red chili powder
- ½ teaspoon turmeric powder
- 1½ teaspoons biryani masala — store-bought is okay, honestly
- 1 teaspoon coriander powder
- Salt to taste — add slowly, eggs already have salt
For layering and aroma:
- ¼ cup fresh mint leaves, chopped
- ¼ cup fresh coriander leaves, chopped
- A pinch of saffron soaked in warm milk — optional but lovely
- 1 tablespoon fried onions — optional, but they feel fancy
ALSO READ: Aalu Paratha Recipe Step-by-Step | Taste Just Like Ghar Ka Paratha
Cooking method – relaxed, step by step but not bossy
Start with the rice. Always. Soak it for about 20 minutes while you prep other things. Then bring water to a rolling boil, add salt, cardamom, bay leaf. Add rice. Cook till it’s about 70% done — still has bite. If you fully cook it now, it’ll cry later. Drain and set aside.
While the rice is doing its thing, heat a little oil in a pan. Toss the boiled eggs with turmeric, chili powder, and salt. Lightly fry them till the surface looks golden and a bit blistered. This step smells amazing. Don’t skip if you can help it. Set eggs aside.
Now comes the heart of egg biryani — the masala. In a heavy pot, heat oil or ghee. Add sliced onions. Cook them slow. Medium flame. Stir often. They should turn deep golden, not rushed brown. This takes time. Put on music. Breathe.
Add ginger-garlic paste. Stir till the raw smell goes away. Add green chilies. Then lower the flame — important — and add whisked yogurt slowly, stirring continuously. If you rush, it splits. Been there. Not fun.
Once the masala looks smooth again, add all the spices — chili powder, turmeric, coriander powder, biryani masala, salt. Cook till oil slightly separates and everything smells… warm and deep.
Add the fried eggs. Gently mix so they get coated. Don’t break them. Let this simmer for 3–4 minutes. Taste the masala. Adjust salt. This is your last chance.
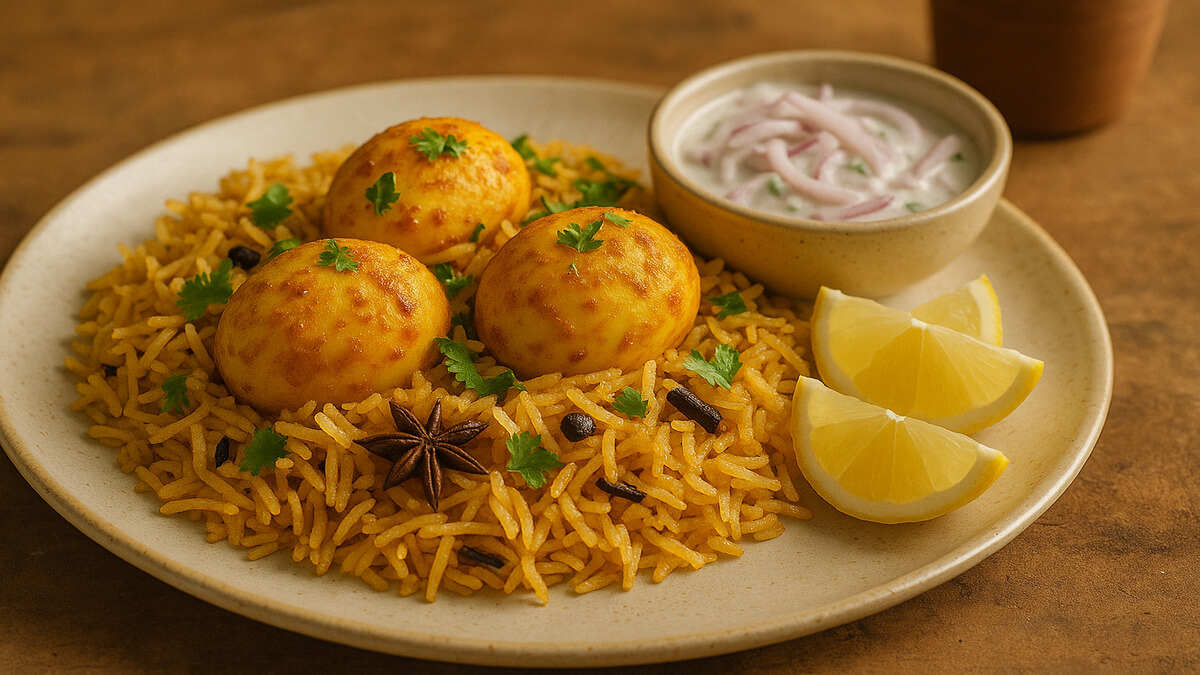
Now layering. Lower the flame. Spread half the rice over the egg masala. Sprinkle mint, coriander, some fried onions, and saffron milk. Then the rest of the rice. Top again with herbs and a little ghee if you’re feeling generous.
Cover tightly. Dum cook on very low heat for 15–20 minutes. No peeking. Let the steam do its work. Turn off heat and rest for 10 minutes before opening. This part matters.
When you open… yeah. That smell.
Variations and substitutes (because kitchens aren’t perfect)
If you want it spicier, add extra green chilies or a pinch of crushed pepper during dum. For a richer taste, replace oil fully with ghee. If yogurt is sour, balance it with a pinch of sugar — sounds odd, works.
For a veg-style feel, you can add sautéed mushrooms or paneer cubes along with eggs. For a lighter version, skip frying eggs and use less oil — still good, just gentler.
Brown rice? You can, but cook it separately and expect a slightly different texture. Not bad. Just different.

Health benefits – keeping it real
Egg biryani isn’t diet food… but it’s not junk either. Eggs provide good protein, which keeps you full. Using home-cooked spices and controlled oil is always better than takeaway. Rice gives energy, and herbs like mint help digestion.
Just don’t drown it in oil and call it healthy. Balance, always.
Approximate nutrition (very rough idea)
One serving gives moderate calories, decent protein from eggs, carbs from rice, and fats depending on oil or ghee used. It’s filling. Comforting. Not light, not heavy — somewhere in the middle.
Serving suggestions (my honest opinion)
Egg biryani tastes best with cool onion raita or plain curd with salt. A squeeze of lemon on top? Yes. Some people like it with salan or gravy, but honestly… it doesn’t need much. I usually eat it as-is. Quietly. No sharing for first few bites.
Storage, leftovers, and reheating tips
Store leftovers in an airtight box in the fridge. It keeps well for 2 days. Reheat gently on the stove with a splash of water, covered. Microwave works too — cover it, or rice dries out. Don’t reheat again and again. Eggs don’t love that.
FAQs about Egg Biryani
1. Can I make egg biryani without frying the eggs?
Yes, you can. It saves time and oil. Fried eggs add flavor, but boiled-only still works.
2. Which rice is best for egg biryani?
Basmati rice is ideal. Long grains, good aroma, less sticky.
3. Can I make egg biryani in a pressure cooker?
You can, but be careful with water and timing. One whistle on very low heat is usually enough.
4. Is egg biryani spicy?
It depends on you. Reduce chili and green chilies for a mild version.
5. Can I prepare egg biryani in advance?
Yes. It actually tastes better after resting for a few hours.
6. What can I serve with egg biryani?
Raita, salad, lemon wedges — simple sides work best.
7. Is egg biryani good for kids?
Yes, just keep the spice level low and skip extra chilies.
Final thoughts – from my kitchen to yours
Egg biryani is not about perfection. It’s about layers, patience, and letting things cook at their own pace. Some days the rice breaks a little. Some days the masala is extra bold. That’s fine.
Happy cooking.


1 thought on “Egg Biryani for Lazy Days and Hungry Nights”